Friday, March 29, 2013

Leprechaun traps


This year, for the first time, I let the kids make Leprechaun traps.  I had seen other teachers do it before and it always was so cute to watch the kids excitement.  Only three of my kids wanted to make them, which was fine. The rest of the kids just wanted to put stickers on my trap.

 The kids used tissue boxes and I used a potato flake can. 


One of my students made his trap at home with his mom and dad.  He then brought it to school and decorated it.

We set the traps up by my desk.  We made sure to include gold, shamrocks, and even Lucky Charms cereal to entice the Leprechauns to come in.  


Alas we did not catch any Leprechauns this year. They did however mess up our room and eat all the Lucky Charms cereal. lol  Maybe next year. 


Friday, March 22, 2013

Rainbow sort

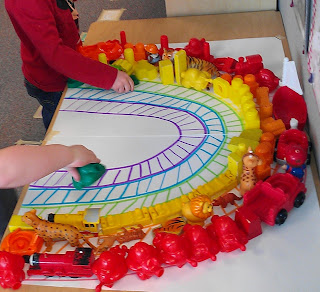
In celebration of St. Patrick's Day I planned a rainbow sort for my class.  I found the idea at this website.  I drew up a simple rainbow and gathered all he tubs of toys we had and explained to the kids what we were doing.  As a group we went from one color to the next having a blast finding enough toys for each color.


After the sort we decided to leave the toys that way for a while, but then the kids wanted to play with some of them so I put them all together in a tub for them to 'Play with a Rainbow'.

 
They played with this tub of toys for most of the day and then toward the end of the day we sorted them all back to their original tubs. I will definitely be using this activity again.

Wednesday, March 13, 2013

Dr. Seuss--10 Apples Up On Top


We recently celebrated Dr. Seuss's birthday by reading his books all week and doing activities that related.  One of my favorite Dr. Seuss books is 10 Apples Up On Top.  I found that a site that has some really cute Dr. Seuss activities. 


 My favorite was where she took the characters from 10 Apples and let her kids color them and then color or glue red things onto apples.  Then they all got stacked on their heads.  I did this for my kids.  They got to decorate up to 10 apples.  A bunch of them did 10 but some did less.  As for what they used to make them red I had a limited supply there. I let them choose between a red marker, red crayon, red pastel crayon, red tissue paper, and stamping red letters. 

I provided a direct link to just the pictures of the characters in case they got buried in the site among other great ideas.  I personally hate when you have to search and search for one idea you want. 

For the apples I did an image search on Yahoo for  apple clip art.

10 Apples Up On Top Characters:
Dog
Lion
Tiger


To go along with the book I made a magnet center. I copied smaller versions of the characters onto yellow paper.  Then I made smaller versions of the apples on white.  I made 30 apples, so that each character would have 10 apples.  I spent a while coloring, cutting, gluing, and covering each one with contact paper.  You can save yourself at least one step by cutting out apple shapes out of red paper (two if you make it red card stock). Then I put and adhesive magnet on all of them.  The kids really like stacking the apples all different ways.  Its fun to see the creativity come through on this activity.

Not sure if I want to make a separate post for this.  I made a giant Cat in the Hat for the kids to take pictures with.  I had to show it off. :)

The kids made large Cat in the Hat hats.  They did not want to stay up very well for photos. lol

Chrystal Shamrocks


I found this website where I fell in love with the ideas of shamrock crystals. I have been wanting to make these type of crystals with my class for a few months now.  The recipe was a very easy one.


SHAMROCK CRYSTALS

NEED:
Chenille stems
String
Pencil
Jars or cups (plastic or glass)
3 cups boiling water
1/2 cup borax
spoon

I had white chenille stems from a previous craft.  I let the kids use green markers to color the stems after I shaped them like a shamrock.  We set those aside to dry a bit while we mixed up the borax solution.

I did all the measuring for the kids since dealing with 3-4 year old children and hot water and soap is not very safe.  I added the 3 cups of water and the Borax into a cup.  Then gave the kids a spoon or some kind of stirring implement and asked them to stir a lot.

Some of the kids enjoyed the stirring, some not so much but still participated.  You need to have most to all of the borax soap dissolved before you submerge the shamrock.  I boiled water in a huge pot in our kitchen, but we could not make these in there as other classes use it for snacks and such, so my water got a bit cooler as I made my way through my 11 students that day.  The soap did not dissolve completely in the cooled down water but the resulting crystals were still pretty impressive.

Once the mixing is done you can submerge the shamrock.  I used the pencil and tied a string on to it them on to the step of the shamrock.  You want to make sure that the whole shamrock is covered by the water.  In the website where I found this idea the poster said to not allow the shamrock to touch the sides of the jar.  I had to use several kitchen glasses and some of our shamrocks were touching the sides but they still turned out just fine.

Now you need to leave the shamrock in the Borax solution over night (mine were in for almost 24 hours) then you can pull them out, dry them gently off, and hang them to enjoy.


The markers I used were washable markers and not super washable dot markers. When we submerged them into the solution the water instantly turned green.  I was a bit bummed by this because I wanted their crystals to be green. Well the washable marker users had white shamrocks, but the dot marker users had slightly green shamrocks. I am going to do this with my daughters this weekend and let them use permanent markers to color their shamrocks.  I am hoping to have different results.  If you want to guarantee to have green shamrocks (or any color really) use chenille stems of the color you want.


When you are done with the solution you can just dump it in the sink. Be aware that I had a freak out moment when I dumped mine, because there were crystals formed on the bottom and sides of all of my glass and plastic jars and cups I used.  They did not seem like it was going to come off easy until I soaked them in hot water for a time. Then I ran them through the dishwasher and they cam out sparkling clean. :)

More fun shamrock crafts:
Faux Tie-dye Shamrocks

Leprechaun Balloon Racing

In the spirit of St. Patrick's Day, I let the kids race balloons with leprechauns on them today.  I found the idea from this website.  I had looked at the post pretty extensively (I thought) and figured I knew exactly what I was doing.  I had the kids color a leprechaun and pick a color of balloon they wanted.
After I blew them up I twisted them a bit at the ends and used clothes pin to hold the end closed until it was time to let the air out.  The clothes pins worked very well and they were easy for the kids to take off when it was their turn to race.


 I made the rainbow coming out of the pot of gold and taped the string to the wall low so the kids could hold it up to let gravity help get the balloon to the pot of gold.  Well I used yarn instead of kite sting (I should have read the sites post better) so the first problem we encountered was getting the yarn into the straw LOL.  But the kids were very patient with me because they were super excited to see this work. I got my balloon on the string (with a paper clip :) to demonstrate what they were going to do when it was their turn to race.  **It should be noted that kite string is what the original site says they used** Well when I let go of the balloon the air came out and it spun around a few times but it did not go forward like I thought it would.  I wasn't sure at first what to do to make it go forward.  I stared at the kids for a minute as if they would have a clue.  Then I thought I will need something with a bigger hole.  I found empty tape rolls and taped them on to the kids balloons and let them try.  They did fly a bit more then the straw but did not make it all the way to the rainbow.


I went through all 6 kids that were here today and each one only sailed about 3 feet before it stopped.  Even though they did not go far the kids still seemed excited at the idea that they went at all.  I told them that we did an experiment and it did not work but it is okay because we can try again another time and see if we can make it work that time.  I gave each child a gold coin for participating. They were excited to show them to their parents at pick up time.

We will try this again I am sure.  I now where my problems were and how to fix them so that it will work next time. :)

Thursday, February 28, 2013

Book of the Week


 This weeks book is titled 'How Many Kisses Do You Want Tonight?' By Varsha Bajaj.  It is a cute counting, rhyming story about different baby animals that want different amounts of kisses.  Starting at one going up to 1 million. 

Monday morning I read the book to the kids and showed them the activity I created for it.


 This is a really fun count the kisses and matching activity. I created the charts in Mircosoft word.  They took a bit of time.  If you would like a copy of them please leave me a comment.  I have them saved on my work computer and will get them transferred to my laptop if there is a want for them. :)
 I gave the kids magnet numbers for matching and gems for counting out the kisses.  When I played it with the kids I made a kissing sound as I put the gems out.  The kids giggled each time I did that.  It was pretty fun.


Wednesday, February 27, 2013

Laundry Alphabet

In preschool learning our letters is such an important thing. It is the gateway to reading and more.  Well I can not sit them down and drill the letters into them, who would want to learn that way?? lol  So I scour Pinterest almost daily for new ways for the kids to PLAY with letters.  I came across a printable, free activity, a week or so ago that you can use in several different ways.  See original site idea here with printable.   I love when I come across free printables. 

After I printed them and laminated them I tried to find a place in my classroom where I could hang sting for the kids to play with them like the teacher did on her site.  Well I could not find such a place.  So instead I turned a piece of card board into a mobile hanging activity.  I covered the card board with some brown paper and glues on yarn and then glued the clothes pins over that.  I spaced them out for easier hanging.  As you can see everything fits on pretty nicely.  I originally forgot to put the letter "L" on there and one of my students was kind enough to point it out.  :) Other then that it was a fairly easy thing to make. I do have the occasional half of the clothes pin that falls off but i have that same problem when using clothes pins in general with my class. Not really sure why they can't keep the clothes pins together but oh well they go right back together with ease.